You need to do the tutorials in the order shown by the Tutorials Map.
In this tutorial, you take an existing COBOL program (supplied), and use
the Interface Mapping Toolkit to create a service from it; that is, to expose
the COBOL application as a service. The tutorial shows how to expose the
COBOL tutorial to a COM interface, an EJB and a Web Service. You can also
create a J2SE bean using the Interface Mapper, and this is similar to creating
an EJB.
This session uses the supplied sample COBOL program, book.cbl. It is a
simple program that maintains an indexed file, a stock file such as might
be in use at a book retailer. To follow this session you need to understand
the outline logic of this program.
You might want to look at the COBOL source while reading this section. It
is in Examples\Net Express IDE\mapdemo. You can display it in Net Express or any
text editor.
Within the mapdemo directory you may notice a subdirectory called Client.
You can ignore this for now. It contains files used in the client tutorials
later in this book.
Commonly an application to be turned into a service is a legacy application,
that is, one that has already been in production use for some time. It is
being turned into a service so that a new modern interface - for example,
a Web interface - can be added (as we'll see later, you write a client application
to create the interface).
The Interface Mapping Toolkit works on a program designed to be a subprogram,
that is, one with a Linkage Section. The Toolkit creates interface files that
map data received from a client application onto the parameters expected.
The original top-level program of the legacy application is not used.
The file booktest.cbl, supplied in the same directory as book.cbl, is
a simple example of such a top-level program. It has a main loop that requests
input from a screen interface and then calls the subprogram to process the
data received. At the start of this session you compile and run this "legacy"
application to familiarize yourself with it.
book.cbl has four functions - Read record, Add record, Delete record, and
Get next record. It has three parameters. They are: the function required;
the data to be processed; and a data item in which to return the file status.
The source identifies which function is required by means of an EVALUATE statement
testing the lnk-function parameter.
For Read record, the caller supplies a book's stock reference number, title
or author in the appropriate field in lnk-b-details. The program looks it
up in the indexed file and returns full details in lnk-b-details. We'll
look at the other functions in the course of the session.
You use the Interface Mapper to define which of the fields sent between the
service and a client is to be mapped onto which of the COBOL program's Linkage
Section parameters.
In COBOL, you describe a data item's data type precisely, using its picture-string.
COM, Java and XML (used for sending data between a client and a Web service)
each define their own sets of data types. The Interface Mapper maps the COBOL
types in your program onto the types available in COM, Java or XML.
You can generate a default mapping, which simply reflects the interface of
the legacy program. In the present example, the client program would have
to send data for lnk-function, lnk-b-details and lnk-file-status, just
as the original top-level program did. lnk-file-status would always be blank
on input. For some functions, some fields within lnk-b-details would also
be blank on input. The program would take the desired path through the EVALUATE
depending on the value received in lnk-function, and then return updated
data in lnk-b-details and lnk-file-status.
But we will provide clients with a much more streamlined service if we expose
the program's four possible actions - Read record, Add record, Delete record,
and Get next record - as separate operations with separate names, and for
each operation we require the client to send just the data that particular
operation actually needs. As you will see in this tutorial, you use the Interface
Mapper to define this more streamlined interface.
If you have closed Net Express, reopen it. If any project window or
other windows are open, close them.
To save you creating a project, we have supplied one - click File > Open
and open Examples\Net Express IDE\Mapdemo\mapdemo.app. You'll see book.cbl and accompanying
files in the project window.
You don't need to build and run the legacy application in order to create
a service, but we will do so to get familiar with it.
- Click Rebuild
 .
.
- On the project window, right-click booktest.int and click Run on the
popup menu.
You can see from the top line of the display that this program uses numeric
codes for the four operations it can perform.
- Type 1 (Read) as the function, tab to the stock number field and type 1111
there, and press Enter.
- Type 1 as the function, tab to the stock number field and type 2222 there,
and press Enter.
- Type 1 as the function, tab to the stock number field and type 3333 there,
and press Enter.
The asterisks and the file status 23 indicate there is no record with that
stock number. There are in fact just two records in the indexed file as supplied.
- Type 2 (Add) as the function, tab to the stock number field and type 4444
there, then type details for an additional book (deleting the asterisks).
For example:
| Title: |
Pride and Prejudice |
| Type: |
Fiction |
| Author: |
Austen |
| Retail: |
08.00 |
| On hand: |
4000 |
| Sold: |
3000 |
and press Enter.
This should be enough to give you the flavor of the application we will be
turning into a service.
- Type 9 as the function and press Enter. Close the Application Output
window using its
 button.
The user interface you have just used is provided by Booktest.cbl, which
we will be discarding. The business logic and file access are done by Book.cbl,
and this will become the service. Later we will see how to write a client
application to provide a new interface.
The process of creating a mapping is very similar for COM, EJB and Web
services; nevertheless there are some differences because of differences between
these mechanisms.
Because of these differences, the rest of this chapter consists of separate
sections for COM, EJB and Web services. Also, we use the first section to
introduce the basic concepts, and then use the subsequent sections to introduce more advanced features. Therefore, whichever you are
interested in, you should do all three sections.
In this section you create a COM service from the Book application.
To create a new mapping:
- Click File > New, select Service Interface and click OK.
The first page of the Mapping Wizard appears. Behind it you see a window
titled Service Interfaces: Mapdemo. The Mapping Wizard and the Service Interfaces
window are both part of the Interface Mapping Toolkit.
It is not strictly necessary to have a project open when creating a mapping.
If no project were open, you would get a dialog box to create a Service Interfaces
group to add the new mapping to. However, it is usually convenient to use
a project.
- On this page of the wizard, you choose what type of service to create and
the source from which the mappings will be created.
From Select type of interface, select COM Interface. Then click Next.
- We want the Mapper to get the information from the currently open project,
rather than us specifying some other project or entering it on the coming
pages of the Mapper.
Make sure Use current Net Express project is selected and click Next.
- You need to tell the Mapper the name of the program containing the Linkage
Section. This program will become the top-level program of the COBOL application
in the service.
Click book.cbl (it should be the second item on the list) to select it
and click Next.
If you look on the Build tab in the Output window at the bottom of the
IDE, you will notice that at this point the project is automatically built.
This means the files produced by the build are available ready for when you
come to deploy the service. These are the executable file book.int and,
because projects have the ANIM directive set by default, the file book.idy
needed during debugging. Because the default build type is General Debug Build,
they are put into the Debug subfolder within the Mapdemo folder.
- You need to define a name by which this service will be known to the outside
world - the name that clients will invoke.
Type cmapserv. Then click Next.
- You need to define how data passed between the service and a client is to
be mapped onto the COBOL program's Linkage Section parameters. This definition
is called a mapping. The Mapping Wizard can create a default mapping, which
you can then edit if desired.
Make sure Default Mapping is selected and click Next.
- Click Finish.
If this tutorial has been run before on your machine, you may get a message
warning you that recompiling Book could invalidate existing mappings. Click
OK. This message refers to the fact that the program has been recompiled
in the course of the Mapping Wizard, and if you had made any source changes
(which you haven't) the program would no longer match mappings created previously.
Two new menus, Operation and Field, are added to the menu bar. The Service
Interfaces window is updated and the Interface Mapper opens. Let's pause to
look at these.
The Service Interfaces window is shown in Figure 2-1. It shows the services
associated with the Mapdemo project. It shows there are three types of services,
and at present just one has been created. The folder it appears in shows which
kind of service it is. The service has one operation, Book, which we will
see more of in a moment.
The set of service interfaces for the Mapdemo project constitute a Service
Interface group. They are stored in mapdemo.mpr. This file is called a repository.
You normally view them through the Service Interfaces window, and don't need
to know this filename except when reopening the window from the File menu.
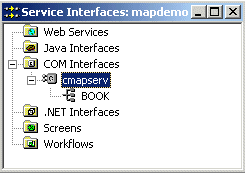
Figure 2-1: The Service Interfaces Window showing one COM interface
The Interface Mapper is shown in Figure 2-2. It should have opened automatically
when you clicked Finish on the wizard. If it didn't, open it now - in the
Service Interfaces window, either double-click the service name or select
the service name and click Service > Edit interface.
The figure shows the Interface Mapper with the tree view fully expanded.
It shows the default mapping that has been created. We will decide in a moment
whether this is what we want, but first let's look at what it means.
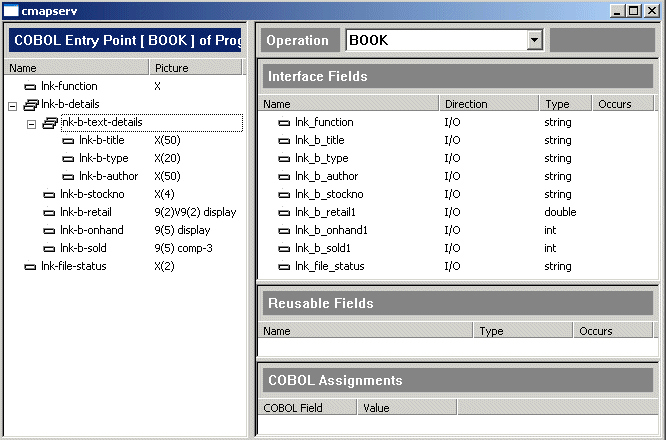
Figure 2-2: Default Mapping for cmapserv
The default mapping has defined a function, or operation, to be offered
by the new service. It has called the operation Book. When a client invokes
this operation, the COBOL program will be entered at the entry point also
called Book, which in this simple program is the start of the Procedure Division.
The left-hand pane shows the program's Linkage Section.
The default mapping has defined a set of interface fields, that is, fields
for passing data between the service and a client. The top right-hand pane
shows these fields. Data will be mapped from these interface fields onto the
program's parameters - a field has been declared for each Linkage Section
item, and a mapping automatically set up between them. Each interface field
has the COM data type most closely equivalent to the picture-string of the
corresponding Linkage Section item.
The fields have the same names as their corresponding Linkage Section items.
If there are duplicate fields, each name is made unique by a number suffix,
such as lnk_b_retail1. We will see later that you can give the interface
fields names of your own choice if you wish.
The interface fields are all separate fields, as required in COM. We will
see later that you can give the interface fields a hierarchical structure
reflecting the COBOL data structure if you wish.
In COM, a parameter can be input, output, I/O, or output return. In the default
mapping, every interface field is I/O.
In this and subsequent sections we refer frequently to the source of the
sample program Book, introduced in the section The Sample Program earlier.
The default mapping has been useful to introduce the Interface Mapper, and
we could use it. A client would send data in the interface fields, the program
would take the desired path through the EVALUATE depending on the data received
in the interface field lnk_function and mapped to the data item lnk-function,
and then the updated data in lnk-b-details and lnk-file-status would be
returned in the interface fields.
But we will provide clients with a much more streamlined service if we expose
the program's four possible actions - Read record, Add record, Delete record,
and Get next record - as separate operations with separate names, and for
each require the client to send just the data that particular operation actually
needs.
So we will now delete the operation created by the default mapping, and in
the following sections we will create the operations we want.
- On the IDE pulldown menus, click Operation > Delete and then click Yes.
All the entries in the Interface Mapper disappear.
To define the "add record" operation:
- On the IDE pulldown menus, click Operation > New.
- Enter Add as the Operation Name
Leave the default BOOK as the entry point. This program has only one entry
point.
- Click OK.
We see from the source book.cbl that the file status from adding the record
to the file is returned in lnk-file-status.
- Drag lnk-file-status to the Interface Fields pane.
This creates an interface field called lnk_file_status. A mapping is automatically
created between the new field and the Linkage Section item it was created
from.
- Double-click the Direction field by the interface field lnk_file_status,
and use the dropdown list to change its direction to Output.
This makes it an output field - in other words it will be included in the
response message sent to the client, rather than expected in the input message
received from the client.
For COM, you have the options Input, Output, I/O, and Output Return,
which makes the field into a return parameter instead of an ordinary output
parameter.
We see from the source that for the "Add record" operation the client program
must supply all the fields for the new record that is to be added to the indexed
file. These fields are received by the Book program in the data item lnk-b-details.
- Drag lnk-b-details to the Interface Fields pane.
This creates an interface field for each data item. The default direction,
Input, is what we want - these are the fields in which data will be received
to be passed onto the data items in lnk-b-details.
The parameter that tells the program which operation is required is lnk-function.
However, an incoming message will not contain a parameter corresponding to
this; instead it will contain the name of the operation, Add. We need to specify
that when a request for Add is received the value put into lnk-function
is the one that causes the "add record" path in the program to be taken. From
the source, we know this value is 2. The field lnk-function is called a
preset COBOL value.
- Drag lnk-function from the left-hand pane to the COBOL Assignments pane.
- Enter 2 as the value and click OK.
Figure 2-3 shows the completed Add operation.
You can save your edits at any time, by the usual methods such as clicking
File > Save or pressing Ctrl+S.
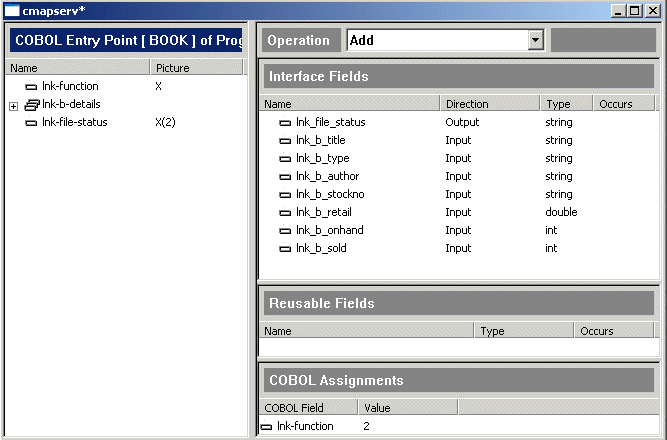
Figure 2-3: The Add Operation (COM)
Let's look in a little more detail at what this means.
The correspondence between Linkage Section items and interface fields is
set up when you do the drag-and-drop. If you right-click an interface field
and click Mappings, you see a dialog box showing the Linkage Section item
associated with it. This correspondence is not affected by the names or order
of interface fields. You can use the dialog box to alter the mapping if you
wish.
In the messages passed between the service and a client, the interface fields
are identified by keywords. Their names in the Interface Fields pane are used
as the keywords. Nevertheless, their order in the Interface Fields pane is
the order in which they are seen by a client, so it is good practice to be
aware of this order. You can re-order fields by dragging them.
In our indexed file, the primary key is the stock number. The "get next record"
path through the program takes a stock number as input, finds the record that
has that stock number, and returns the record following it.
In the program, this operation uses the Linkage Section item lnk-b-details
as both an input and output parameter - although on input lnk-b-stockno
is the only part of lnk-b-details actually used.
- Right-click the word Operation below the title bar, and on the popup menu
click New.
Using this popup menu is an alternative to the pulldown menu we used before.
- Enter Next as the operation name and click OK.
The Interface Fields and COBOL Assignments panes for the new operation
are blank so you can begin defining your interface fields and preset values.
The Linkage Section remains visible so you can access it to create fields
and preset values from it.
- Define the preset COBOL value as in the section Define a COBOL Assignment above. As you can see from the source, the value for lnk-function is 4.
- Define the output parameter lnk_file_status as in the section Define
an Interface Field above. Remember to change its direction to Output.
- The "get next record" branch gets the required record from the file and returns
it. So we need a set of output fields in which to return the fields of this
record.
Drag lnk-b-details from the left-hand pane to the Interface Fields pane.
- Change the direction of each of the fields created in Step 5 to Output.
- The field lnk_b_stockno is not only one of the output fields, but is also
the field in which the key identifying the required record is input.
Change the direction of the interface field lnk_b_stockno to I/O.
Figure 2-4 shows the completed Next operation.
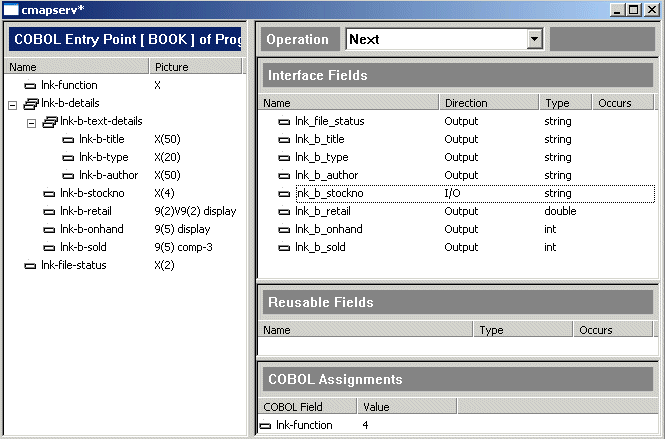
Figure 2-4: The Next Operation (COM)
The "read record" path through the program uses lnk-b-details as both an
input and output parameter. On input, it expects the stock number, title,
or author to be supplied; the other data items in lnk-b-details are ignored.
On output, lnk-b-details is used to return the record indicated by the supplied
stock number, title, or author.
- Click Operation > New, enter Read as the operation name and click
OK.
- Define the preset COBOL value as above. As you can see from the source, the
value for lnk-function is 1.
- Define the output parameter lnk_file_status as above. Remember to change
its direction to Output.
- The "read record" branch gets the required record from the file and returns
it. So we need a set of output fields in which to return the fields of this
record.
Drag lnk-b-details from the left-hand pane to the Interface Fields pane.
- Change the direction of the interface fields lnk_b_title, lnk_b_author
and lnk_b_stockno to I/O.
- Change the direction of each of the remaining interface fields created in
Step 4 to Output.
Figure 2-5 shows the completed Read operation.
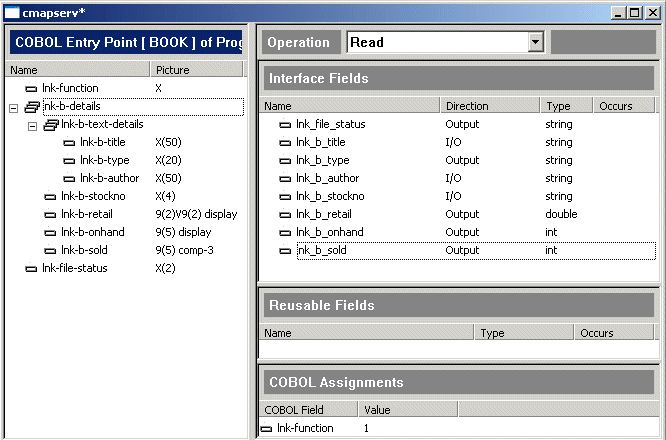
Figure 2-5: The Read Operation (COM)
The "delete record" path, like the "read record" path, expects the stock
number, title, or author to be supplied. The other data items in lnk-b-details
are ignored. It deletes the record indicated by the supplied stock number,
title, or author.
To define the "delete record" operation:
- Click Operation > New, enter Delete as the operation name and click
OK.
- Define the preset COBOL value as above. As you can see from the source, the
value for lnk-function is 3.
- Define the output parameter lnk_file_status as above. Remember to change
its direction to Output.
No output fields are required other than the file status.
- In the left-hand pane, expand the tree for lnk-b-details and lnk-b-text-details.
- Drag lnk-b-title, lnk-b-author and lnk-b-stockno from the left-hand
pane to the Interface Fields pane.
Figure 2-6 shows the completed Delete operation.
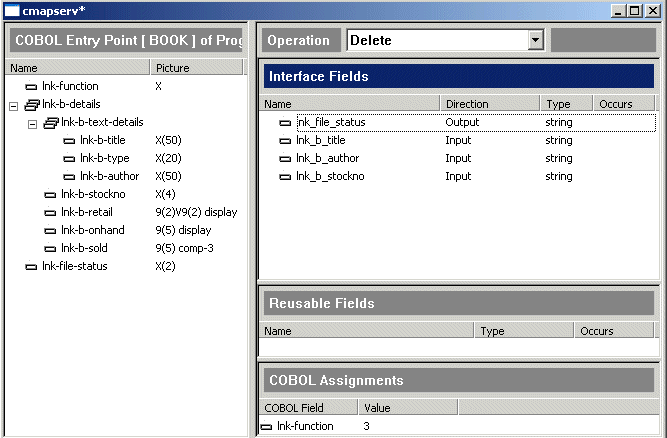
Figure 2-6: The Delete Operation (COM)
If you want to double-check that you have defined the operations correctly
in your COM interface, you can check them against the following table. You
can switch between operations, to view them, by using the dropdown list next
to the operation name on the title bar.
|
Add |
Next |
Read |
Delete |
| Function code |
2 |
4 |
1 |
3 |
| Input |
All fields for Details record |
none |
none |
Title; Author; Stock number |
| Output |
File status |
All other fields from Details record; File status |
All other fields from Details record; File status |
File status |
| I/O |
none |
Stock number |
Title; Author; Stock number |
none |
| Output Return |
none |
none |
none |
none |
You have now defined all four operations to be provided by this service.
-
Close the Interface Mapper by clicking its  button. If a message appears
asking if you want to save, click Yes.
- In the Service Interfaces window, expand the tree for your service.
Figure 2-7 shows the tree view for cmapserv. The four operations you
have defined are now shown.
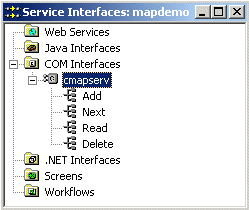
Figure 2-7: The Updated Service Interfaces Window
If you want to see the files that have been created, look in subfolders of
the folder Examples\Net Express IDE\mapdemo.
In subfolder debug, files book.int and book.idy were created when the
project was automatically built during the Mapping Wizard. These are the files
you would normally expect from a build.
In subfolder \mapdemo\repos (that is, Examples\Net Express IDE\mapdemo\mapdemo\repos,
several files have been created, including the following:
| book.xml |
Describes the legacy program |
| cmapserv.xml |
Describes the service |
In this section you create a service from the Book application, as you did
in the section COM, but this time as an EJB. You use some more advanced
facilities of the Interface Mapper, building on what we covered in the earlier
section.
To create a new mapping:
- Click File > New, select Service Interface and click OK.
The first page of the Mapping Wizard appears. Behind it you see a window
titled Service Interfaces: Mapdemo. The Mapping Wizard and the Service Interfaces
window are both part of the Interface Mapping Toolkit.
It is not strictly necessary to have a project open when creating a mapping.
If no project were open, you would get a dialog box to create a Service Interfaces
group to add the new mapping to. However, it is usually convenient to use
a project.
- On this page of the wizard, you select what type of service to create. From Select type of interface, select Java
Interface. Then click Next.
- We want the Mapper to get the information from the currently open project,
rather than us specifying some other project or entering it on the coming
pages of the Mapper.
Make sure Use current Net Express project is selected and click Next.
- You need to tell the Mapper the name of the program containing the Linkage
Section. This program will become the top-level program of the COBOL application
in the service.
Click book.cbl (it should be the second item on the list) to select it
and click Next.
If you look on the Build tab in the Output window at the bottom of the
IDE, you will notice that at this point the project is automatically built.
This leaves the files produced by the build - the executable file book.int
and the file book.idy needed during debugging - available ready for when
you come to deploy the service. Because the default build type is General
Debug Build, they are put into the Debug subfolder within the Mapdemo
folder.
- You need to define a name by which this service will be known to the outside
world - the name that clients will invoke.
Type JMapServ. Be careful to get the case right. Then click Next.
- You need to define how data passed between the service and a client is to
be mapped onto the COBOL program's Linkage Section parameters. This definition
is called a mapping. The Mapping Wizard can create a default mapping, which
you can then edit if desired.
Make sure Default Mapping is selected and click Next.
- Click Finish.
You may get a message warning you that recompiling Book could invalidate
existing mappings. Click OK. This message refers to the fact that the program
has been recompiled in the course of the Mapping Wizard, and if you had made
any source changes (which you haven't) the program would no longer match mappings
created previously.
Two new menus, Operation and Field, are added to the menu bar. Let's
pause to look at these. The Service Interfaces window is updated and the
Interface Mapper opens.
The Service Interfaces window is shown in Figure 2-8. It shows the services
associated with the Mapdemo project. It shows there are three types of services,
and at present just one has been created. The folder it appears in shows which
kind of service it is. The service has one operation, Book, which we will
see more of in a moment.
The set of service interfaces for the Mapdemo project constitute a Service
Interface group. They are stored in mapdemo.mpr. This file is called a repository.
You normally view them through the Service Interfaces window, and don't need
to know this filename except when reopening the window from the File menu.
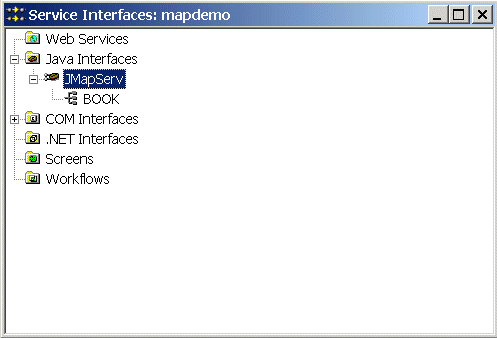
Figure 2-8: The Service Interfaces Window showing one Java Interface
The Interface Mapper is shown in Figure 2-9. It should have opened automatically
when you clicked Finish on the wizard. If it didn't, open it now - in the
Service Interfaces window, either double-click the service name or select
the service name and click Service > Edit.
The figure shows the Interface Mapper with the tree view fully expanded.
It shows the default mapping that has been created. We will decide in a moment
whether this is what we want, but first let's look at what it means.
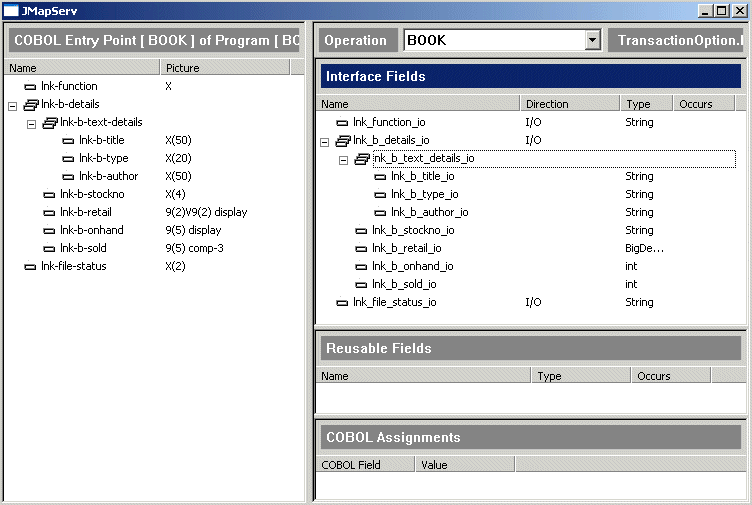
Figure 2-9: Default Mapping for JMapServ
The default mapping has defined a function, or operation, to be offered
by the new service. It has called the operation Book. When a client invokes
this operation, the COBOL program will be entered at the entry point also
called Book, which in this simple program is the start of the Procedure Division.
The left-hand pane shows the program's Linkage Section.
The default mapping has defined a set of interface fields, that is, fields
for passing data between the service and a client. The top right-hand pane
shows these fields. Data will be mapped from these interface fields onto the
program's parameters - a field has been declared for each Linkage Section
item, and a mapping automatically set up between them. Each interface field
has the Java data type most closely equivalent to the picture-string of the
corresponding Linkage Section item.
The fields are given names based on the corresponding Linkage Section items.
To avoid any risk of name clashes, each name is formed by concatenating the
Linkage Section item's name with the name(s) of any group item(s) containing
it. Hyphens are replaced by underscores because hyphens are not allowed in
names of variables in Java. We will see later that you can give the interface
fields names of your own choice if you wish.
In Java, a parameter can be input, output or I/O. In the default mapping,
every interface field is I/O.
Transaction not supported on the right-hand side of the title bar is the
EJB transaction attribute for a container managed transaction. This attribute
will appear in the EJB deployment descriptor. This is the default. We do not
cover this in these tutorials.
In this and subsequent sections we refer frequently to the source of the
sample program Book, introduced in the section The Sample Program earlier.
The default mapping has been useful to introduce the Interface Mapper, and
we could use it. A client would send data in the interface fields, the program
would take the desired path through the EVALUATE depending on the data received
in the interface field lnk_function and mapped to the data item lnk-function,
and then the updated data in lnk-b-details and lnk-file-status would be
returned in the interface fields.
But we will provide clients with a much more streamlined service if we expose
the program's four possible actions - Read record, Add record, Delete record,
and Get next record - as separate operations with separate names, and for
each require the client to send just the data that particular operation actually
needs.
So we will now delete the operation created by the default mapping, and in
the following sections we will create the operations we want.
- On the IDE pulldown menus, click Operation > Delete and then click
Yes.
All the entries in the Interface Mapper disappear.
To define the "add record" operation:
- Click Operation > New.
- Enter Add as the Operation Name
Leave the default BOOK as the entry point. This program has only one entry
point.
- Click OK.
We see from the source book.cbl that the file status from adding the record
to the file is returned in lnk-file-status.
- Drag lnk-file-status to the Interface Fields pane.
This creates an interface field called lnk_file_status. A mapping is automatically
created between the new field and the Linkage Section item it was created
from.
- Double-click the Direction column by the interface field lnk_file_status,
and use the dropdown list to change its direction to Output.
This makes it an output field - in other words it will be included in the
response message sent to the client, rather than expected in the input message
received from the client.
For EJB, you have the options Input, Output and I/O.
We see from the source that for the "Add record" operation the client program
must supply all the fields for the new record that is to be added to the indexed
file. These fields are received by the Book program in the group item lnk-b-details.
- Drag lnk-b-details to the Interface Fields pane.
The default direction, Input, is what we want - this is the group of fields
in which data will be received to be passed onto the data items in lnk-b-details.
The new field created is called lnk_b_details. However, we cannot have
group fields with the same name in more than one operation. Therefore, we
will change the name to ensure that it is different from that used for similar
groupings in the other operations for this interface.
- Double-click on the lnk_b_details field created in the Interface Fields
pane. Change the name to addop_details and click OK.
Knowledge of the application and how it is used might enable you to make
further refinements to the new interface. For example, notice that the retail
price field lnk-b-retail is defined as 99V99. If you fully expand
the tree for addop_details in the Interface Fields pane, you will see that
lnk_b_retail has therefore defaulted to BigDecimal. Let us imagine that
you know the prices are in fact always a whole number of dollars, and that
lnk_b_retail can therefore be simply an int:
- Fully expand the tree for addop_details in the Interface Fields pane.
- Double-click BigDecimal in the Interface Fields pane.
- Select int from the dropdown list.
The parameter that tells the program which operation is required is lnk-function.
However, an incoming message will not contain a parameter corresponding to
this; instead it will contain the name of the operation, Add. We need to specify
that when a request for Add is received the value put into lnk-function
is the one that causes the "add record" path in the program to be taken. From
the source, we know this value is 2. The field lnk-function is called a
COBOL Assignment.
- Drag lnk-function from the left-hand pane to the COBOL Assignments pane.
- Enter 2 as the value and click OK.
Figure 2-10 shows the completed Add operation.
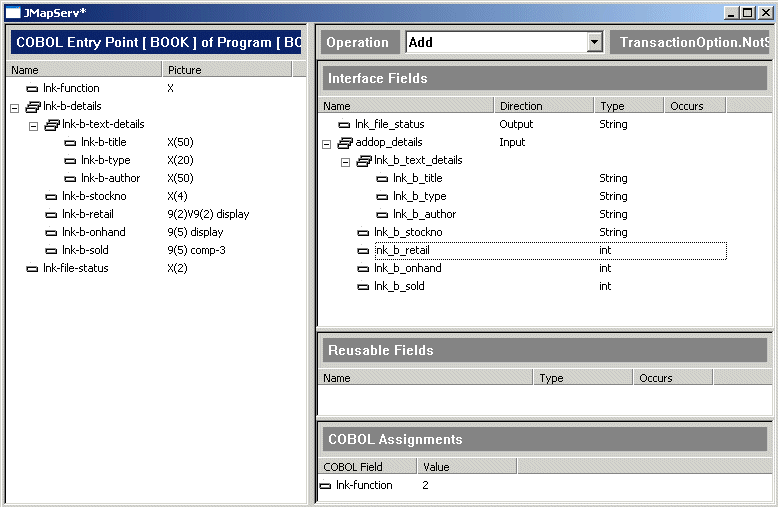
Figure 2-10: The Add Operation (EJB)
Let's look in a little more detail at what this means.
The correspondence between Linkage Section items and interface fields is
set up when you do the drag-and-drop. If you right-click an elementary interface
field and click Mappings, you see a dialog box showing
the Linkage Section item associated with it. This correspondence is not affected
by the names or order of interface fields. You can use the dialog box to alter
the mapping if you wish.
In the messages passed between the service and a client, the interface fields
are identified by keywords. Their names in the Interface Fields pane are used
as the keywords. Nevertheless, their order in the Interface Fields pane is
the order in which they are seen by a client, so it is good practice to be
aware of this order. You can re-order fields by dragging them.
In our indexed file, the primary key is the stock number. The "get next record"
path through the program takes a stock number as input, finds the record that
has that stock number, and returns the record following it.
In the program, this operation uses the Linkage Section item lnk-b-details
as both an input and output parameter - although on input lnk-b-stockno
is the only part of lnk-b-details actually used.
- Right-click the word Operation below the title bar, and on the popup menu
click New.
Using this popup menu is an alternative to the pulldown menu we used before.
- Enter Next as the operation name and click OK.
The Interface Fields and COBOL Assignments panes for the new operation
are blank so you can begin defining your interface fields and preset values.
The Linkage Section remains visible so you can access it to create fields
and preset values from it.
- Define the preset COBOL value as in the section Define a COBOL Assignment above. As you can see from the source, the value for lnk-function is 4.
- Define the output parameter lnk_file_status as in the section Define
an Interface Field above. Remember to change its direction to Output.
- The "get next record" branch gets the required record from the file and returns
it. So we need a set of output fields in which to return the fields of this
record.
Drag lnk-b-details from the left-hand pane to the Interface Fields pane.
The new field created is called lnk_b_details. As we did when creating
the Add operation, we will change the field name to ensure that it is different
from the name used for similar groupings in the other operations for this
interface.
- Double-click on the lnk_b_details field created in the Interface Fields
pane. Change the name to nextop_details and click OK.
- Fully expand the tree for nextop_details, and change the type
of lnk_b_retail to int as in the section Change a Type above.
- Change the direction of the nextop_details field to Output.
- The field lnk_b_stockno is not only one of the output fields, but is also
the field in which the key identifying the required record is input. To handle
this, we will now create another input field.
Drag lnk-b-stockno from the left-hand pane to the Interface Fields pane.
Be careful not to drop it amongst the fields subordinate to nextop_details.
If you did, it would also be made subordinate to nextop_details.
Figure 2-11 shows the completed Next operation.
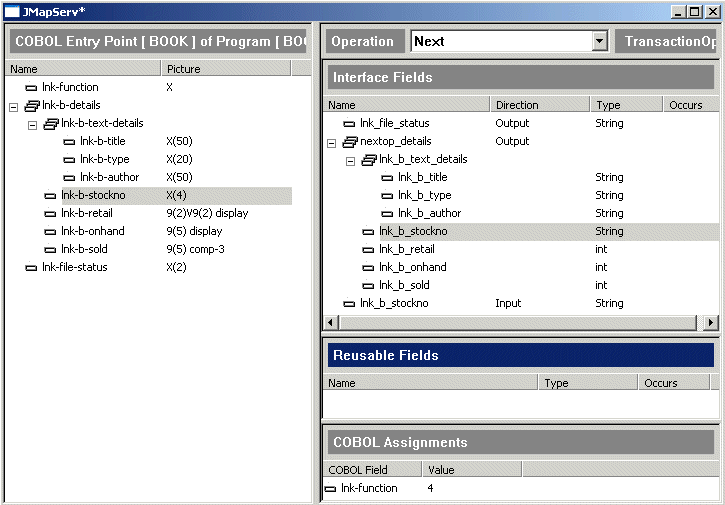
Figure 2-11: The Next Operation (EJB)
The "read record" path through the program uses lnk-b-details as both an
input and output parameter. On input, it expects the stock number, title,
or author to be supplied; the other data items in lnk-b-details are ignored.
On output, lnk-b-details is used to return the record indicated by the supplied
stock number, title, or author.
- Click Operation > New, enter Read as the operation name and click
OK.
- Define the preset COBOL value as above. As you can see from the source, the
value for lnk-function is 1.
- Define the output parameter lnk_file_status as above. Remember to change
its direction to Output.
- The "read record" branch gets the required record from the file and returns
it. So we need a set of output fields in which to return the fields of this
record.
Drag lnk-b-details from the left-hand pane to the Interface Fields pane.
- Double-click on the lnk_b_details field created in the Interface Fields
pane. Change the name to readop_details and click OK.
- Expand the tree for readop_details in the Interface Fields pane and change
the type of lnk_b_retail to int as above.
- Change the direction of readop_details to Output.
We now need to define our input fields. In doing this, we will demonstrate
another feature of the Interface Mapper.
- Drag lnk-b-details to the Reusable Fields pane.
In Java terms, a reusable mapping is a custom record.
- Fully expand the tree under lnk_b_details in the Reusable Fields pane.
- Ungroup lnk_b_text_details so that all the items are at the same level.
To do this, right-click lnk_b_text_details and click Ungroup.
- Delete each elementary field in the Reusable Fields pane except lnk_b_title,
lnk_b_author and lnk_b_stockno. To delete a field, either click it and
press Delete or right-click it and click Delete.
- If the tree view closes, open it again to see what you have created. You
have defined the reusable mapping shown in Figure 2-12:

Figure 2-12: The Reusable Mapping Created for your EJB
- Drag lnk_b_details from the Reusable Fields pane to the Interface Fields
pane. Drop it in the Interface
Fields pane, making sure not to drop it amongst the fields that are subordinate
to readop_details.
This creates an interface field of type lnk_b_details. By default, it too
is called lnk_b_details. We could change this name if we wished, but we
will accept the default.
We could have done it this way for COM as well, had we wished. For EJB,
defining a reusable mapping creates a custom record according to the CustomRecord
interface defined in the Common Client Interface (CCI) from Sun. For more
details see the section CustomRecord and Other EJB Support in the chapter
Mapping a Java Interface and Using Resource Adapters in your Java and
COBOL book.
For COM, it creates a new complex data type, with the items within the group
structure exposed as its properties. The effect, and the way you use the Reusable
Fields pane, is the same in each case.
Figure 2-13 shows the completed Read operation.
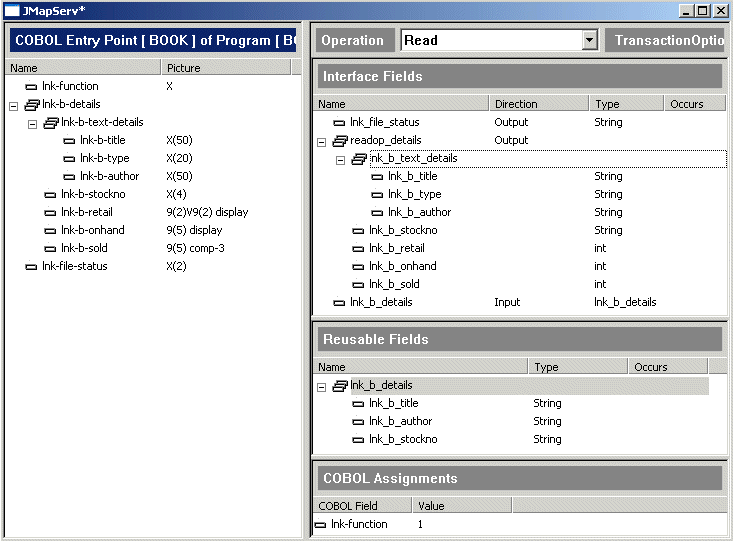
Figure 2-13: The Read Operation (EJB)
The "delete record" path, like the "read record" path, expects the stock
number, title, or author to be supplied. The other data items in lnk-b-details
are ignored. It deletes the record indicated by the supplied stock number,
title, or author.
To define the "delete record" operation:
- Click Operation > New, enter Delete as the operation name and click
OK.
Like the Linkage Section, any reusable mappings you have defined remain visible
whichever operation is currently displayed.
- Define the COBOL assignment as above. As you can see from the source,
the value for lnk-function is 3.
- Define the output parameter lnk_file_status as above. Remember to change
its direction to Output.
No output fields are required other than the file status.
- Drag lnk_b_details from the Reusable Fields pane to the Interface Fields
pane.
Figure 2-14 shows the completed Delete operation.
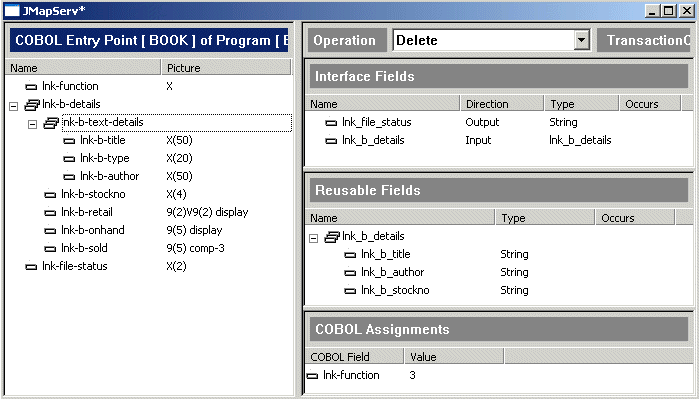
Figure 2-14: The Delete Operation (EJB)
If you want to double-check that you have defined the operations correctly
in your EJB, you can check them against the following table. You can switch
between operations, to view them, by using the dropdown list next to the operation
name on the title bar.
|
Add |
Next |
Read |
Delete |
| Function code |
2 |
4 |
1 |
3 |
| Input |
A group containing all fields for Details record |
Stock number |
Group containing Title; Author; Stock number |
Group containing Title; Author; Stock number |
| Output |
File status |
A group containing all fields from Details record; File status |
A group containing all fields from Details record; File status |
File status |
| I/O |
none |
none |
none |
none |
You have now defined all four operations to be provided by this service.
-
Close the Interface Mapper by clicking its  button. If a message appears
asking if you want to save, click Yes.
- In the Service Interfaces window, expand the tree for your service if it
is not already expanded.
Figure 2-15 shows the tree view for JMapServ. The four operations you
have defined are now shown.
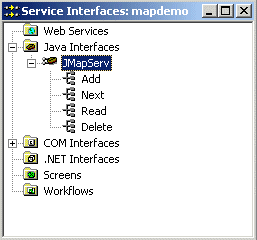
Figure 2-15: The Updated Service Interfaces Window
If you want to see the files that have been created, look in subfolders of
the folder Examples\Net Express IDE\mapdemo.
In subfolder debug, files book.int and book.idy were created when the
project was automatically built during the Mapping Wizard. These are the files
you would normally expect from a build.
In subfolder \mapdemo\repos (that is, Examples\Net Express IDE\mapdemo\mapdemo\repos,
several files have been created, including the following:
| book.xml |
Describes the legacy program |
| JMapServ.xml |
Describes the service |
In this section you create a service from the Book application, as you did
in the sections COM and EJB, but this time as a Web service.
You use some more advanced facilities of the Interface Mapper, building on
what we covered in the earlier sections.
To create a new mapping:
- Click File > New, select Service Interface and click OK.
- From Select type
of interface, select Web Service. Then click Next.
- Make sure Use current Net Express project is selected and click Next.
- Click book.cbl (it should be the second item on the list) to select it
and click Next.
- Type wmapserv as the service name, then click Next.
- As before, it will be useful for the purposes of this tutorial to see the
default mapping that the Mapping Wizard can create.
Make sure Default Mapping is selected and click Next.
- Click Finish.
You may get a message warning you that recompiling Book could invalidate
existing mappings. Click OK. This message refers to the fact that the program
has been recompiled in the course of the Mapping Wizard, and if you had made
any source changes (which you haven't) the program would no longer match mappings
created previously.
The Interface Mapper opens as before, and the Service Interfaces window is
updated to show the new service.
Figure 2-16 shows the Interface Mapper with the default mapping that
has been created. The figure shows the tree views fully expanded.
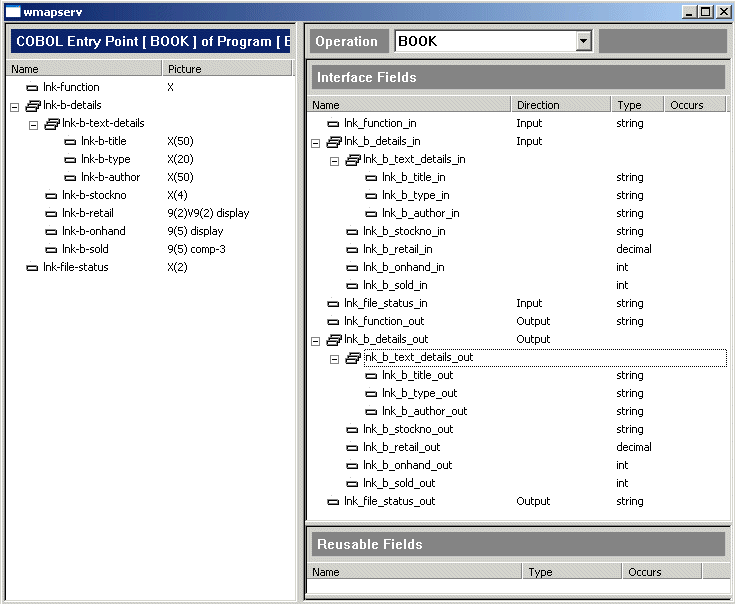
Figure 2-16: Default Mapping for the Web service wmapserv
As before, the default mapping has created one operation, called Book.
In a Web service, an interface field is either an input or output field -
it is in either the incoming message or the response message. Therefore, in
this default mapping, two interface fields are created for each Linkage Section
item - an input field and an output field.
The interface fields have a hierarchical structure reflecting that of the
Linkage Section items. This grouping will be reflected in the XML messages.
The interface fields have XML data types, and names based on the corresponding
Linkage Section items. The hyphens are replaced by underscores. Since two
fields are declared for each Linkage Section item, they have _in and _out
appended.
In the messages passed between the service and a client, the interface fields
are identified by keywords. Their names in the Interface Fields pane are used
as the keywords. Nevertheless, their order in the Interface Fields pane is
the order in which they are seen by a client, so it is good practice to be
aware of this order.
Moreover, if you intend to use .NET to create a client for your Web service,
note that .NET has a convention that the first output parameter in the WSDL
file is fed to the client program as the return parameter. If you want a particular
field to be first, you can drag it to the top of the Interface Fields pane.
Make sure you drop it above, not on, the currently first item - if the latter
is a group and is highlighted when you drop the field you are moving, the
field will go inside the group instead of before it.
As before, we will get rid of the default mapping and define our own operations.
- Click Operation > Delete and then click Yes.
- Click Operation > New, enter Add as the operation name and click OK.
- Define the preset COBOL value lnk-function as you did earlier, with value
2.
As before, we need to create an output field to return the file status. In
the process we will look at a couple more points about the Interface Mapper:
- Drag lnk-file-status to the Interface Fields pane.
- Double-click the Direction field by the interface field lnk_file_status,
and use the dropdown list to change its direction to Output.
Notice that you do not have the I/O option that you had for COM and EJB,
since the XML messages for a Web service are strictly one-directional.
- One of the most important files that the Interface Mapping Toolkit creates
for a Web service is the WSDL file - the formal description of the service.
This file is used for creating clients. The field name that has been automatically
generated is perfectly acceptable, but perhaps will not be very meaningful
to people reading the WSDL file or client code generated from it. We can give
the field a new name.
Double-click the name lnk_file_status in the Interface Fields pane, and
over-type the name with FileStatus.
Of course, people writing clients for COM or EJB see the interface field
names too. We could have done this for COM and EJB too, if we had wished.
As before, we need to create a set of interface fields to receive the data
for the new record to be added to the file. Here a Web service has a problem
that does not affect COM or EJB.
In the WSDL file that will be generated, each field corresponding to an elementary
COBOL item is defined with a primitive XML data type. For each group item,
a complex type is defined. lnk-b-details is a group item, and also contains
a group item lnk-b-text-details.
In a WSDL file, each complex type must be declared with a unique name. But
lnk-b-details is used in three of the four operations (only Delete neither
receives nor returns a record). If we drag it to the Interface Fields pane
in each of the three operations, the Interface Mapper will try to declare
the complex types lnk_b_details and lnk_b_text_details three times each,
thus making the WSDL file invalid.
To avoid this, we will declare the necessary complex types here in the Interface
Mapper instead.
You saw the Reusable Fields pane in the section EJB. You use it in
the same way for COM, EJB and Web services. For EJB, defining a reusable
field creates a custom record according to the CustomRecord interface defined
in the Common Client Interface (CCI) from Sun. For COM, it creates a new
complex data type, with the items within the group structure exposed as its
properties. For a Web service, it creates a new complex data type. The effect
is the same in each case.
- Drag lnk-b-details to the Reusable Fields pane.
- Fully expand the tree under lnk_b_details in the Reusable Fields pane.
- We can give the fields in a reusable mapping more suitable names, just as
we did for an interface field above. Again, this is not necessary, but may
be helpful to someone reading the WSDL file or a client program generated
from it.
Double-click each field name in the Reusable Fields pane in turn, and in
each case delete the lnk_b_ and make the remaining first letter upper case.
For example, lnk_b_details becomes Details.
- Drag Details to the Interface Fields pane.
This creates an interface field of type Details. By default, it too is called
Details. We could change this name if we wished, but we will accept the default.
Figure 2-17 shows the completed Add operation.
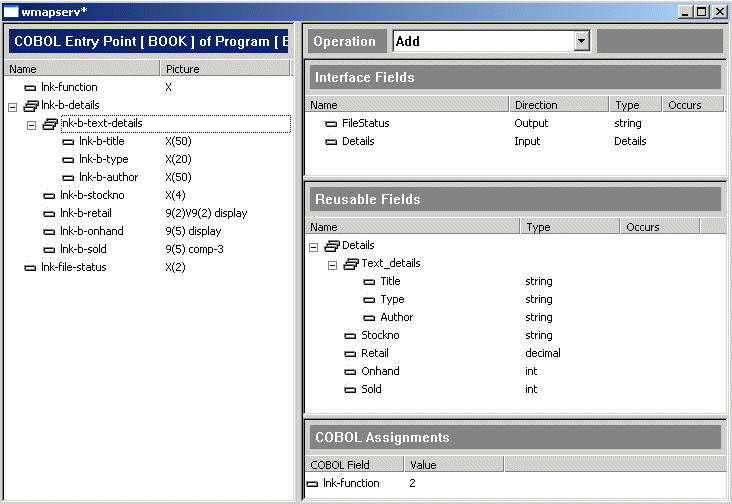
Figure 2-17: The Add Operation (Web service)
The "get next record" path through the program returns the contents of the
requested record in the Linkage Section item lnk-b-details.
- Click Operation > New, enter Next as the operation name and click
OK.
- Define the preset COBOL value lnk-function as you did earlier, with value
4.
- Define the interface field FileStatus as above. Remember to change its
name from lnk_file_status and its direction to Output.
- Drag Details to the Interface Fields pane as above, and change the direction
of the interface field created to Output.
In the program, this operation uses lnk-b-details for both input and output
- although on input lnk-b-stockno is the only part of lnk-b-details actually
used.
In a Web service, an interface field cannot be used for both input and output.
So we need to create a separate input field that will map onto lnk-b-stockno.
If we look at the program source again, we see that the remaining two operations,
Read and Delete, take input from lnk-b-stockno too. They both also take
input from lnk-b-title and lnk-b-author in a similar way.
We could simply drag each field to the Interface Fields pane when defining
the operations that need it, and then, if we wished, change its name there.
But we can save a little work by using the Reusable Fields pane again.
- In the left-hand pane, expand the tree for lnk-b-details.
-
Drag lnk-b-stockno to the Reusable Fields pane.
Be careful not to drop it among the fields subordinate to Details. If you
did, it would itself be made subordinate to Details.
- Change the name of the reusable field created to BookStockno.
The Interface Mapper will not let us call it simply Stockno, since there
is already a field of that name in this pane.
- We could drag lnk-b-title and lnk-b-author similarly, but we will take
the opportunity to show a couple more features.
Drag lnk-b-text-details (the group item subordinate to lnk-b-details)
to the Reusable Fields pane.
The tree view in the Reusable Fields pane may automatically contract.
- Right-click the reusable field lnk_b_text_details just created, and click
UnGroup.
- Select the reusable field lnk_b_type and press Delete. Click Yes
on the confirmation message.
- Change the name of lnk_b_title to BookTitle and of lnk_b_author to
BookAuthor.
The above illustrates some of the editing features in the Reusable Fields
pane. Similar features are available in the Interface Mappings pane.
By creating these three reusable mappings we have saved ourselves a small
amount of work - we have done the renaming in one go, so we will not need
to rename these interface fields each time we create them in the remaining
two operations. We could have handled FileStatus in the same way if we had
wished.
- Drag the reusable mapping BookStockno to the Interface Fields pane.
Figure 2-18 shows the completed Next operation.
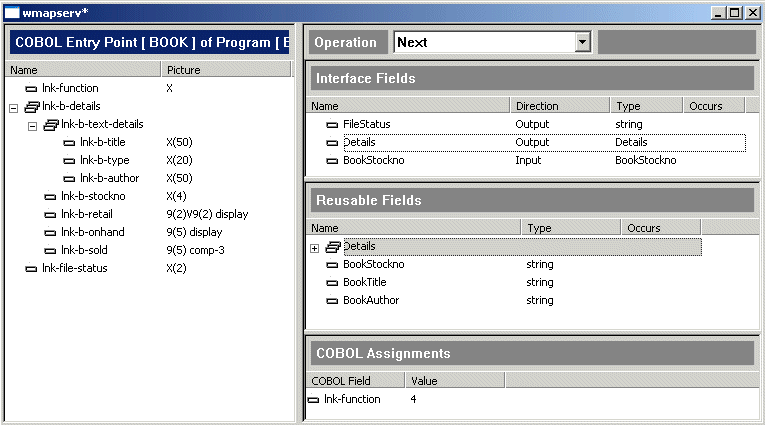
Figure 2-18: The Next Operation (Web service)
Creating this operation is quite simple in the light of what we have done
so far:
- Click Operation > New, enter Read as the operation name and click
OK.
- Define the preset COBOL value lnk-function as you did earlier, with value
1.
- Define the interface field FileStatus as above. Remember to change its
name from lnk_file_status and its direction to Output.
- Drag Details to the Interface Fields pane as above. Remember to change
the direction of the interface field created to Output.
- Drag each of BookStockno, BookTitle, and BookAuthor to the Interface
Fields pane.
Figure 2-19 shows the completed Read operation.
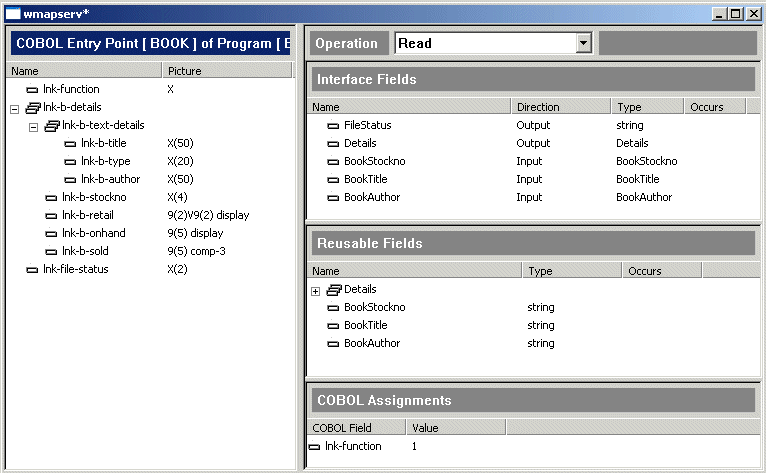
Figure 2-19: The Read Operation (Web service)
Again, creating this operation is now quite simple:
- Click Operation > New, enter Delete as the operation name and click
OK.
- Define the preset COBOL value lnk-function as you did earlier, with value
3.
- Define the interface field FileStatus as above. Remember to change its
name from lnk_file_status and its direction to Output.
- Drag each of BookStockno, BookTitle, and BookAuthor to the Interface
Fields pane.
Figure 2-20 shows the completed Delete operation.
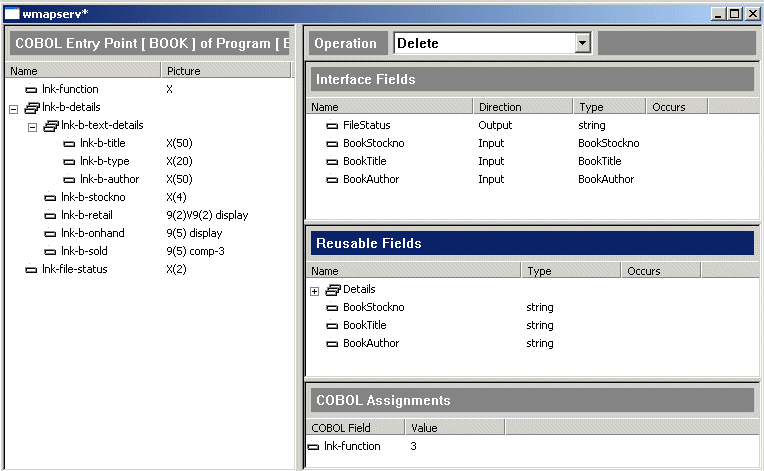
Figure 2-20: The Delete Operation (Web service)
If you want to double-check that you have defined the operations in your
Web service correctly, you can check them against the following table.
|
Add |
Next |
Read |
Delete |
| Function code |
2 |
4 |
1 |
3 |
| Input |
Details record |
Stock number |
Title; Author; Stock number |
Title; Author; Stock number |
| Output |
File status |
Details record; File status |
Details record; File status |
File status |
The files that have been created are the same as for COM or EJB. The WSDL
file will be created when you deploy the service, in the chapter Deploying
a Service.
Close the Interface Mapper. If you are asked if you want to save, click Yes.
To see how to deploy a service, continue at the chapter Deploying a Service.
If you want to take a break first, you can close Net Express and/or the project
- you will need to re-open them during the next chapter.
Copyright © 2006 Micro Focus (IP) Ltd. All rights reserved.
 .
. button.


