You need to do the tutorials in the order shown by the Tutorials Map.
In the previous chapter, Creating a Service, you created a service
from a COBOL program.
The service now needs to be deployed:
- If it's a Web service, you deploy it under a Micro Focus enterprise server.
- If it's an EJB, you deploy the COBOL service under a Micro Focus enterprise
server, and you deploy the EJB and its client under a J2EE application server
such as IBM WebSphere or BEA WebLogic.
- If it's a COM interface, you simply deploy it in Net Express and then
register it under Windows.
All three cases are covered in this chapter.
In production use, the Micro Focus Enterprise Server product is typically
set up on a dedicated server machine, and administering it is the job of the
site administrator. However, it is also optionally installed on your machine
when you install Net Express. In this tutorial you start it
so you can deploy your service.
- For a COM interface:
If Net Express, the project Mapdemo, and the Service Interfaces window
aren't open, open them now - to open the Service Interfaces window, click
File > Open Service Interfaces, then select mapdemo.mpr from Examples\Net Express IDE\Mapdemo
and click Open.
Go to the section Deploy a COM Interface.
- For a Web service:
You will need Net Express and the project Mapdemo later in this chapter.
For now, it does not matter whether they are open or not.
Go to the section Deploy a Web Service or a COBOL Service for an EJB.
- For an EJB:
You will need Net Express and the project Mapdemo later in this chapter.
For now, it does not matter whether they are open or not.
You need to install and configure one of the following third-party J2EE
application servers: BEA WebLogic and IBM WebSphere. We give instructions
specific to WebLogic 8.1 and WebSphere 5.0 Advanced Edition. If you have
another supported version of WebLogic or WebSphere there will be minor differences,
but it will work in essentially the same way.
You also need a Java Development Kit (JDK) 1.3.x (or higher) installed. We
recommend that you use the JDK supplied with your J2EE application server.
Make sure that your PATH environment variable points to the bin directory
of the correct JDK. You set the PATH using a command such as:
set path=jdk-installation\bin;%path%
Also make sure that mfcobol.jar is specified by the CLASSPATH environment
variable. For example:
set classpath=NX-install-directory\base\bin\mfcobol.jar;%classpath%;.;
Go to the section Deploy a Web Service or a COBOL Service for an EJB.
See Third Party Software for details of the supported
versions of the JDK, J2EE application servers and J2SE run-time environments.
Do this section if your service is a COM interface.
- In the Service Interfaces window, right-click the entry for cmapserv, then
click Deploy.
A message box appears showing progress messages, and other messages are shown
in the Output area at the bottom of the IDE. After some seconds you get a
message saying deployment has completed successfully. Click OK.
This has built a .dll file and stored it in a deployment folder used for
this Service Interface group. You now need to go to this folder and register
the .dll file under COM.
- At a Windows command prompt, change directory to Examples\Net Express IDE\mapdemo\mapdemo\repos\cmapserv.deploy.
- At the same prompt, enter:
regsvr32 cmapserv.dll
If you redeploy a COM interface (for example, to update it, or if you
want to repeat this tutorial), you will need to register it again, since your
updated .dll file will contain a new GUID (globally unique identifier, the
key by which COM identifies individual objects).
- The .dll file contains the new interface - it does not contain your original
COBOL application. To make your COBOL application available for the .dll
file to call, you need its executable files to be in a folder that is on the
COBDIR environment variable.
Use Control Panel > System> Environment to add the folder Examples\Net Express IDE\mapdemo\debug
to COBDIR (create COBDIR if it does not already exist).
The files book.int and book.idy were created in this folder when the
project was built automatically when you were using the Mapping Wizard.
You also need to make sure the COBOL application can find its data files.
This is covered in the Client Tutorials part of this book.
Deployment of your COM interface is now complete. Please go to the section
Before Continuing.
In this section you deploy the Web service or the COBOL service for an EJB
to Enterprise Server.
An enterprise server is an environment in which services can run. Installing
the Enterprise Server product creates an enterprise server on your machine.
You can then create more if you wish.
To enable you to administer your enterprise servers, the Enterprise Server
product installs a facility called Enterprise Server Administration, which
has a Web interface. This means you could administer the enterprise servers
from anywhere on the Web. In the present case it is convenient to do it at
your own machine.
- Click Start > Programs > Micro Focus Net Express >
Configuration > Enterprise Server > Administration
This displays the home page of Enterprise Server Administration, shown in
Figure 3-1. Some details such as the version number and the status log
may be different on your machine.
Alternative ways of starting Enterprise Server Administration are to click
Tools > Enterprise Server > Administration in the Net Express
IDE, or to start a Web browser and enter the URL http://localhost:86.
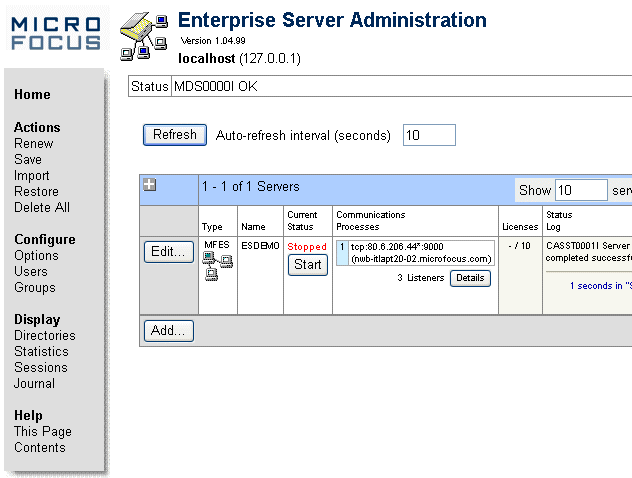
Figure 3-1: Home Page of Server Administration
The main thing on this Web page is a list of enterprise server definitions.
When you define an enterprise server, you specify its configuration. One such
definition is created by default, and although you can define more it is often
sufficient to use the default one. Its name is ESDEMO. In Figure 3-1,
ESDEMO is the only entry in the list. We use ESDEMO throughout these sessions.
- To start the enterprise server ESDEMO, click Start in the Current Status
column.
- If the console window is visible, wait until the message "Communications
interface initialization complete" appears; otherwise, wait a few seconds.
Then click the Refresh button near the left-hand side of the Web page (not
your browser's own Refresh button) until the entry in the Current Status
column changes to "Started".
If you want to configure whether the console window is displayed, click Edit,
then check or uncheck Show Local Console, then click OK. The change takes
effect when you next restart ESDEMO. You can also see the console messages
in the Web browser, by clicking Details in the Current Status column and
then clicking Diagnostics > ES Console.
You need to specify some details before you deploy. You do this in the IDE.
If Net Express, the project Mapdemo, and the Service Interfaces window
aren't open, open them now. To open the Service Interfaces window, click File
> Open Service Interfaces, then select mapdemo.mpr from Examples\Net Express IDE\Mapdemo
and click Open.
- In the Service Interfaces window, right-click the entry for your service
(wmapserv or JMapServ), then click Settings.
- If you are creating a Web service, and this is the first time anyone has
done this on your computer, you get the dialog box shown in Figure 3-2.
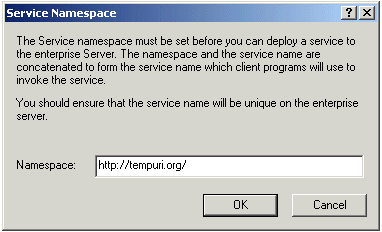
Figure 3-2: Service Namespace Dialog Box
You can use this dialog box to specify a namespace - a name that will be
combined with the name you gave the service to form the name by which clients
will invoke the service. You might have a company standard that you should
enter here. If not, leave it unchanged at the default http://tempuri.org/.
You will not see this dialog box again, but if you need to change this setting
later, you can do so via the Advanced button on the next dialog box. For
now, click OK to accept the default namespace.
- If you are creating an EJB, the General tab on the Mapping Properties
dialog box appears, offering you the choice of generating an EJB or a Java
bean. Click EJB, then click the Deployment Server tab.
Figure 3-3 shows the Deployment Server tab for a Web service. For an
EJB, this tab is slightly different: the Advanced button is not present.
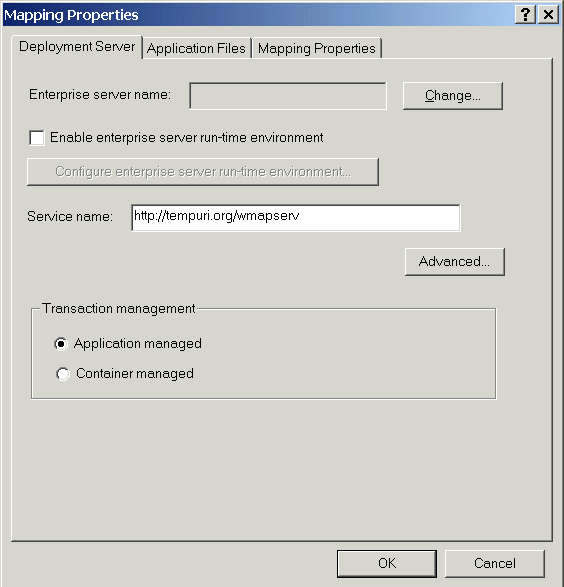
Figure 3-3: Mapping Properties Dialog Box
Some points to note about this dialog box:
- In the Enterprise Server Name field, you choose the deployment service
to use. From that field, the enterprise server to deploy to is determined.
We will set the field in a moment.
- The Enable Enterprise Server run-time environment check box and button
give access to a dialog box where you can configure certain aspects of the
environment in which your service will run; you can set switches, tunables,
environment variables and so on. We do not use this in this tutorial.
- The Service Name field gives the name by which clients will access the
service. For a Web service, it consists of the name you specified when creating
the service, concatenated with the namespace specified above. We do not need
to change it.
- Click the Change button beside the Enterprise Server Name field.
- Click ESDEMO to select it and click OK. ESDEMO is the name of the enterprise
server that is created automatically when you install the product.
- Click the Application Files tab, then click Legacy application needs deploying.
- Using the Add files button, add the files bookfile.dat and bookfile.idx
from the mapdemo folder, and the files book.int and book.idy from the
mapdemo\debug folder. The dialog box should look like Figure 3-4 (substituting
your own path for that shown).
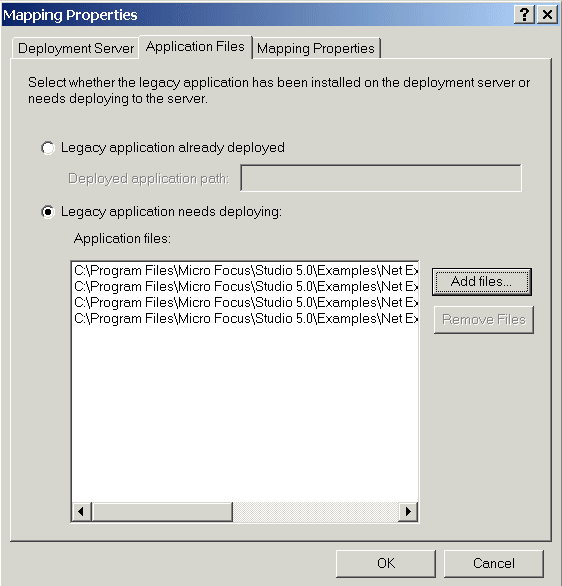
Figure 3-4: Application files to be Deployed
The files you list here are copied to the enterprise server when you deploy.
The .int file is the executable file. The .idy file is needed to enable
you to debug the service. The .dat and .idx files are the
data and index parts of the indexed file that was supplied with the demo,
and which you added one record to at the start of the previous chapter, Creating a Service.
By default, the current directory for the execution of a service is set to
the directory where the service starts executing. Therefore, the service will
pick up the data file you deployed with it - not the original file in the
mapdemo directory.
-
For EJB only:
- Click the EJB Generation tab.
- In the Classpath field, specify the path to your EJB connector classes.
For WebSphere, the path is websphere-install-directory\AppServer\lib\j2ee.jar.
For WebLogic, the path might be similar to weblogic-install-directory\server\lib\weblogic.jar.
- In the Application server field, choose the version of the application
server that you are using.
- Accept the default values for the other fields.
- Click OK.
Having now entered the details we are ready to deploy the service.
- Make sure your service (wmapserv or JMapServ) is still selected in the
Service Interfaces window, and click Service > Deploy.
A log appears showing the progress of the deployment. After some seconds
it ends with a message saying deployment has completed successfully.
If ever deployment fails you can see the reason in this Deployment Progress
window. Also, the failure message contains the path to the deployment log
file - so you can type that address into a browser and view it that way.
- Click OK.
You also see messages in the Enterprise Server Console Daemon window saying
the deployment has succeeded.
You may want to minimize the IDE at this point.
- On the home page of the Enterprise Server Administration, in your Web browser,
click the Refresh button near the left-hand side (not your browser's own
Refresh button).
Notice that the Objects column now shows nine services and one package, where
earlier it showed five services and no packages.
- Click Details next to the "9 Services" entry.
This displays a Web page showing the services available from the ESDEMO enterprise
server. As well as the four services you just deployed, there are five system
services that were present by default. The new services are shown as Available,
meaning they are available for a client to invoke. The services table is shown
in Figure 3-5.
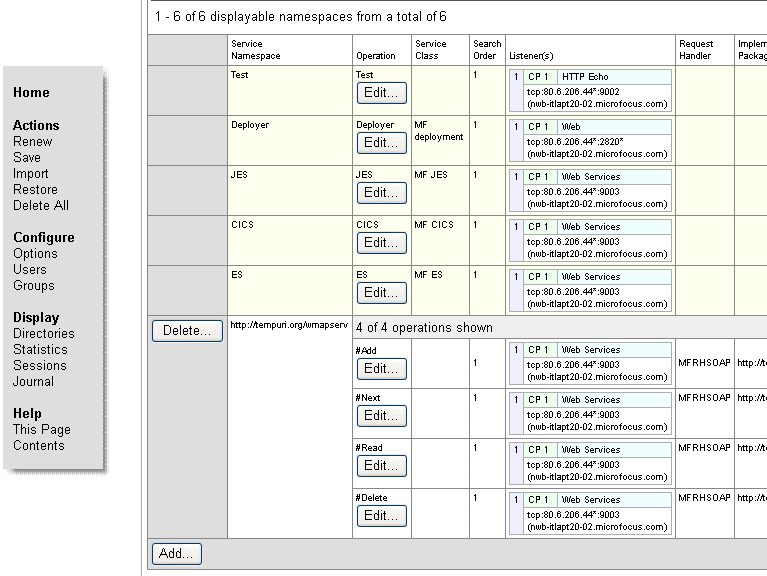
Figure 3-5: Deployed Services Page
- When you've finished looking at the list, click
 next to the name of the
server at the top of the table to return to the home page of Enterprise Server
Administration.
If you want to see the files that have been created ready for you to deploy
your EJB or Web service, look in subfolders of the folder Examples\Net Express IDE\mapdemo.
In subfolder mapdemo\repos (that is, Examples\Net Express IDE\mapdemo\mapdemo\repos,
the following file has been created (where servicename is wmapserv or JMapServ):
| servicename.properties |
Defines the deployment settings that you specified |
In subfolder mapdemo\repos\servicename.deploy, several files have been
created, including the following:
| servicename.car |
COBOL archive file for your service. It contains all the generated files
that need to be deployed, including the mapping information, the COBOL application,
and the data files. You can view the contents using Winzip. |
| servicename.idt |
Contains the mapping information. This file is packaged within the above
.car file |
| wmapserv.wsdl (Web Services only) |
XML file defining the interface to the service. You give this file to people
writing client applications. |
| JMapServ.jar (EJB only) |
Java archive file containing the generated EJB. This EJB is for use only
if you don't generate a client for the EJB. If you do generate a client, a
new EJB is generated and packaged with the client. |
If you need to redeploy a Web service or the COBOL service for an EJB (for
example, to update it, or if you want to repeat this tutorial), you need to
delete it from Enterprise Server first.
If you want to repeat this tutorial, delete your service as follows. Otherwise,
do not do this section - you need to leave the service deployed ready for
subsequent chapters.
To delete the service:
- On the Home page of Enterprise Server Administration, click Details on
the Services line in the Objects column.
- In the left-hand column, click Delete on the line for wmapserv.
- Ensure that Delete associated packages has a checkmark.
- Click OK below the "Are you sure?" message.
-
Messages in the console window show the service and associated packages
being deleted. You are returned to the Services page, where you see that
the service is no longer shown.
To redeploy the service:
- In the IDE, simply right-click wmapserv or JMapServ in the Service Interfaces
window and click Deploy.
To see how to write client applications to use your service, first read the
section Types of Client. Then, continue at whichever chapter interests
you:
If you want to take a break first, you can close Net Express and/or
the project and/or the repository - you will need to re-open Net Express
and the project in a later chapter.
Copyright © 2006 Micro Focus (IP) Ltd. All rights reserved.


 next to the name of the
server at the top of the table to return to the home page of Enterprise Server
Administration.